🚀 How to Deploy Gatsby.js into AWS
— CloudFront, S3, Route53, Amazon Web Services, Gatsby.js, Terraform — 6 min read
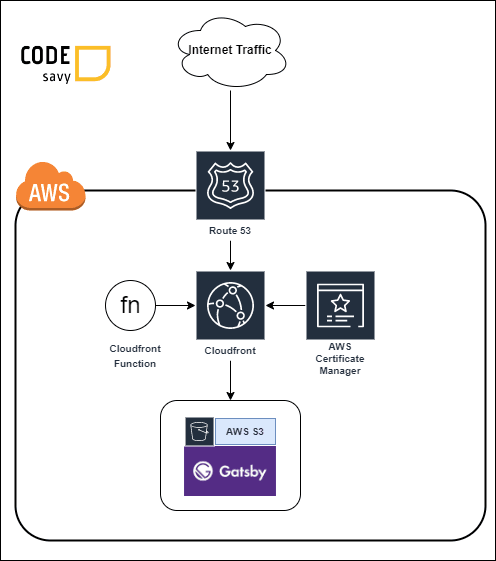
[Originally posted: January 1, 2023] There are several ways to achieve this but we'll try to go with one of the cheapest and fastest architecture - the AWS S3, CloudFront and Route53 combo which can serve millions of users with just pennies!
Architecture
Don't tell, show!
Pre-requisites
Before proceeding, please make sure you already have the following:
- Gatsby Application
- TerraForm
- AWS Account
- Domain Name hosted via AWS Route53
- A Terminal. VScode or something similar
Create AWS Infrastructure using Terraform
Steps:
1. Create a main.tf file, and copy content below
- Using the code below & TerraForm, you can create the whole Infrastructure in just a few minutes instead of hours while you sit down and relax :)
1provider "aws" {2 alias = "virginia"3 region = "us-east-1"4}5
6variable "root_domain_name" {7 type = string8 default = "YOURDOMAIN.com"9}10
11locals {12 application_domain = var.root_domain_name13}14
15resource "aws_s3_bucket" "s3_bucket" {16 bucket = local.application_domain17 acl = "public-read"18 policy = <<POLICY19{20 "Version":"2012-10-17",21 "Statement":[{22 "Sid":"AddPerm",23 "Effect":"Allow",24 "Principal": "*",25 "Action":["s3:GetObject"],26 "Resource":["arn:aws:s3:::${local.application_domain}/*"]27 }]28}29POLICY30 website {31 index_document = "index.html"32 error_document = "404.html"33 }34}35
36resource "aws_acm_certificate" "ssl_cert" {37 domain_name = var.root_domain_name38 validation_method = "DNS"39 subject_alternative_names = ["*.${var.root_domain_name}"]40 provider = aws.virginia41
42 lifecycle {43 create_before_destroy = true44 }45}46
47data "aws_route53_zone" "selected" {48 name = var.root_domain_name49 private_zone = false50}51
52data "aws_cloudfront_cache_policy" "CachingOptimized" {53 name = "Managed-CachingOptimized"54}55
56resource "aws_cloudfront_function" "s3_cloudfront_gatsby_url_resolver" {57 name = "s3_cloudfront_gatsby_url_resolver"58 runtime = "cloudfront-js-1.0"59 comment = "Resolve issue with CloudFront returning 404 for direct routes created by Gatsby"60 publish = true61 code = file("cloudfrontFunction.js")62}63
64resource "aws_cloudfront_distribution" "frontend_cloudfront_distribution" {65 origin {66 domain_name = aws_s3_bucket.s3_bucket.bucket_domain_name67 origin_id = local.application_domain68 }69
70 enabled = true71 is_ipv6_enabled = true72 default_root_object = "index.html"73
74 default_cache_behavior {75 viewer_protocol_policy = "redirect-to-https"76 cache_policy_id = data.aws_cloudfront_cache_policy.CachingOptimized.id77 compress = true78 allowed_methods = ["GET", "HEAD", "OPTIONS"]79 cached_methods = ["GET", "HEAD", "OPTIONS"]80 target_origin_id = local.application_domain81 min_ttl = 082 default_ttl = 8640083 max_ttl = 3153600084
85 function_association {86 event_type = "viewer-request"87 function_arn = aws_cloudfront_function.s3_cloudfront_gatsby_url_resolver.arn88 }89 }90
91 custom_error_response {92 error_caching_min_ttl = 300093 error_code = 40494 response_code = 40495 response_page_path = "/404.html"96 }97
98 aliases = [local.application_domain, "www.${local.application_domain}"]99
100 restrictions {101 geo_restriction {102 restriction_type = "none"103 }104 }105
106 viewer_certificate {107 acm_certificate_arn = aws_acm_certificate.ssl_cert.arn108 ssl_support_method = "sni-only"109 minimum_protocol_version = "TLSv1.2_2021"110 cloudfront_default_certificate = false111 }112}113
114output "cf_dist_id" {115 value = try(aws_cloudfront_distribution.frontend_cloudfront_distribution.id, "")116 description = "ID of CloudFront distribution"117}118
119output "cf_dist_domain" {120 value = try(aws_cloudfront_distribution.frontend_cloudfront_distribution.domain_name, "")121 description = "ID of CloudFront distribution"122}123
124resource "aws_route53_record" "root" {125 zone_id = data.aws_route53_zone.selected.zone_id126 name = local.application_domain127 type = "A"128 alias {129 name = aws_cloudfront_distribution.frontend_cloudfront_distribution.domain_name130 zone_id = aws_cloudfront_distribution.frontend_cloudfront_distribution.hosted_zone_id131 evaluate_target_health = false132 }133}134
135resource "aws_route53_record" "www" {136 zone_id = data.aws_route53_zone.selected.zone_id137 name = "www.${local.application_domain}"138 type = "CNAME"139 ttl = "300"140 records = [local.application_domain]141}Important Note: If you are not using AWS Route53 to host your domain, you would have to find a way to allow your CloudFront to access a valid SSL certificate and point the DNS (root & www) into the CloudFront domain name to be generated later. You will also need to remove line 124-141 in the file above.
2. Create the CloudFront Function File
- If you notice on main.tf line 61, it needs a
cloudfrontFunction.jsfile in order to work. - On the same folder as the
main.tffile, create a new file with namecloudfrontFunction.jswith the code as shown below:
1function handler(event) {2 var request = event.request;3 // replace dangling / in the url with /index.html4 request.uri = request.uri.replace(/\/$/, "/index.html");5 return request;6}- This is very important because CloudFront doesn't know how to route requests to direct links with the correct files/folders in S3.
A request to
/blog/your-awesome-post/will result to HTTP error 404 because CloudFront doesn't know that request to/blog/your-awesome-post/should load/blog/your-awesome-post/index.htmlHence CloudFront needs some means to fix the routing issue. - One alternative is to use Lambda@edge to solve the same problem but CloudFront function is preferred for a couple of reasons:
- Faster
- Runs on Edge locations closest to the user
- Doesn't have cold starts
- Cheaper
- Per 1 Million requests, Lambda@Edge costs $0.60, while CloudFront Function costs $0.10.
- More Execution, for FREE
- CloudFront Functions has an additional 1M free executions(2M, total) compared to AWS Lambda
- Less hassle to Configure
- You only need to create the function & attach it to the CloudFront Distribution. Compared to the same hassle + Creating Multiple IAM configurations
- Faster
3. Configure your Terminal to use AWS Credentials
You can follow this official AWS Documentation on how to do so.
4. Get your Terminal ready in the correct folder
- Open your Terminal, and locate the folder where you have created the
main.tffile. - If you are using VSCode, it would be as easy as (CTRL+`)
5. Execute the TerraForm file (main.tf)
- In the folder where you have your
main.tffile, run this command and wait for it to finish.
terraform apply -auto-approve- Important: Make sure to save the cloudfront distribution id(cf_dist_id) somewhere because you will need it in the deployment step below.
- Congratulations 🎉 You now have a complete infrastructure for your Gatsby.js app!
- Note: This Infrastructure enables your Gatsby.js Web App to be available in both root domain, and sub-domain www.
Deploy your Gatsby.js App
1. Install s3-deploy
npm install s3-deploy -Dor
yarn add s3-deploy2. Add your Deployment Script
In your package.json file, add a "deploy" script under "scripts" which could be something like this:
{ "scripts": { "deploy": "s3-deploy './public/**' --cwd './public/' --region <REGION> --bucket <YOURDOMAIN.COM> --distId <CLOUDFRONT_DISTRIBUTION_ID> --gzip --invalidate '/*' --cache 86400" }}Edit the deployment script to include the correct REGION, BUCKET NAME, and CLOUDFRONT_DISTRIBUTION_ID
Note: This npm module is preferred over the gatsby-plugin-s3 because it invalidates the CloudFront cache after a successful deployment which enables your latest application to be served to your beloved users.
3. Run your deployment Script! 🚀🚀🚀
Build you Gatsby.js application first
npm buildand upload the build
npm run deployTo see if you have deployed and configured everything successfully, visit your root domain (YOURDOMAIN.com) and www sub-domain (www.YOURDOMAIN.com) if everything works well.
- You now have a Gatsby.js application running in your AWS Infrastructure. I hope this article has been helpful to you in any way!
Gatsby.js Deployment to AWS FAQs
1. How do we fix Gatsby Flashing 404 page?
You can overcome the issue using the highlighted code in the following example:
1import * as React from "react";2
3const browser = typeof window !== "undefined" && window;4
5const NotFound = () => {6 return (7 browser && (8 <div>9 <h1>404 - Page Not Found</h1>10 <p>Unfortunately we couldn't find what you were looking for :(</p>11 </div>12 )13 );14};15
16export default NotFound;Very Important:
- While this solves the flashing problem, what is actually served to the user is the 404.html page with HTTP error code 404 which doesn't have the correct SEO tags and is really bad for SEO, and sometimes causes the app not showing any preview when shared into messaging platforms like messenger or slack.